What a Material Takeoff Actually Looks Like on a Hardscape Job
Breaking complex hardscape areas into zones and layers unlocks accurate material quantities.
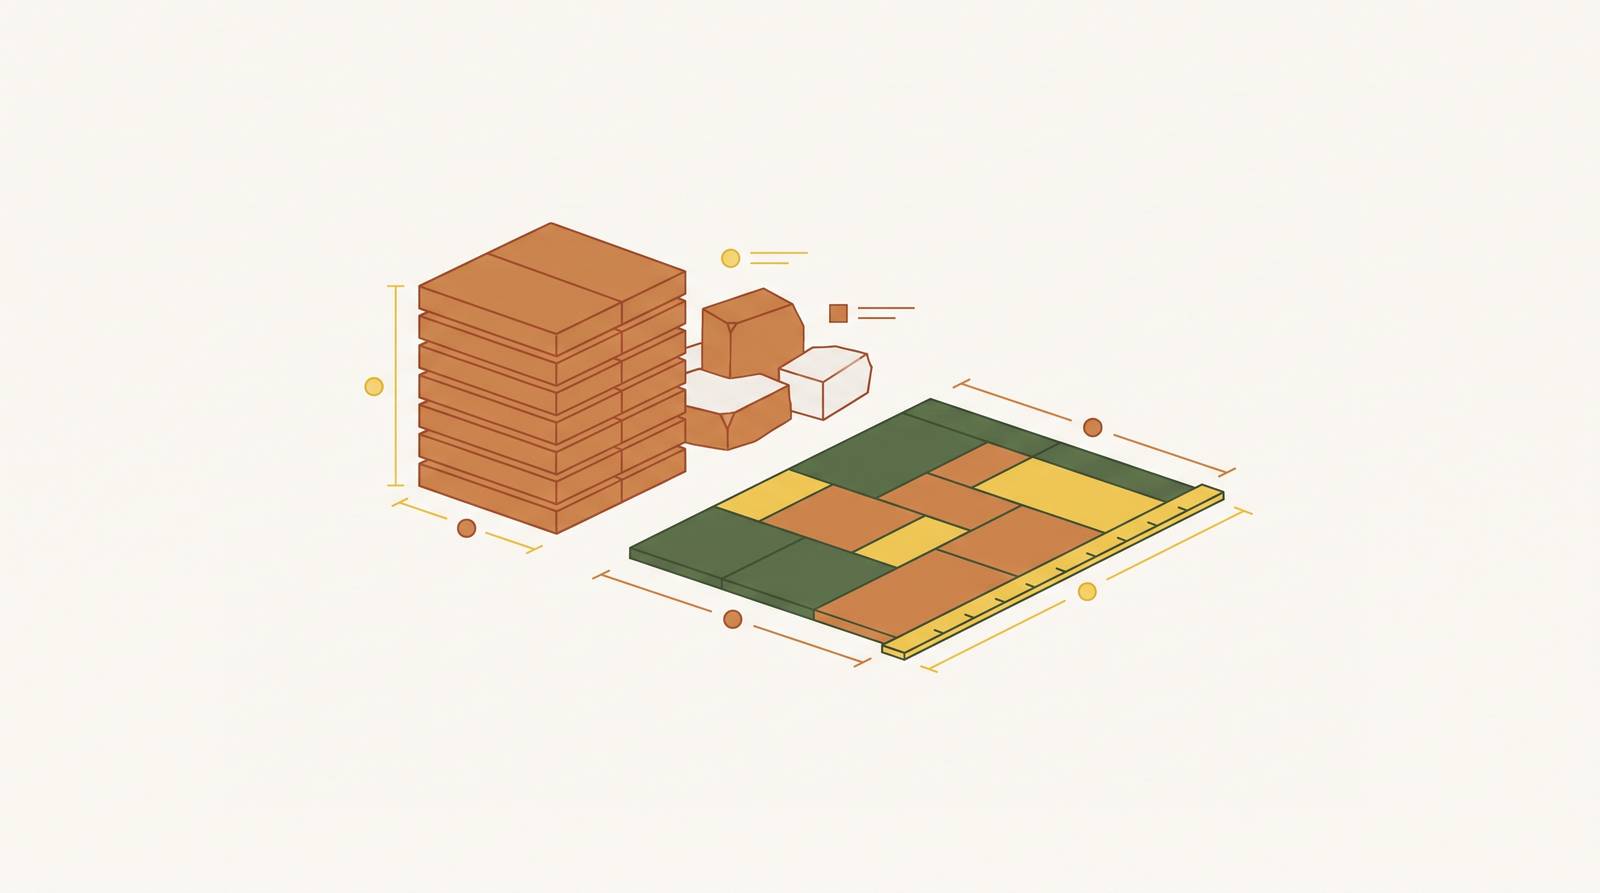
Start with the site plan, then go walk the site. Preferably in that order, but definitely both. You need overall dimensions of the hardscape zone before anything else moves forward, and a plan that hasn't been field-verified has a way of surprising you at the worst possible moment, usually when you're already committed to a price.
Irregular shapes get broken into rectangles and triangles; you sum the parts. Document every individual calculation, not just the final area figure. If a dispute surfaces later, you need to show your work. That habit has saved more contractor relationships than any contract clause.
Separate the zones immediately. A patio, a walkway, and a driveway are not interchangeable areas on a takeoff. Each zone gets its own measurement because base specifications differ by application: pedestrian zones sit on the shallower end of the aggregate base range, driveways handling passenger vehicles need meaningfully more depth, and commercial applications with regular truck traffic need more still, contingent on what the subgrade can actually bear. That determination has to happen here, at the measurement stage, because base depth feeds directly into every cubic yard calculation downstream.
While you're capturing areas, take your linear measurements too. Perimeter footage for edging, wall runs, soldier course borders: record all of it now. Going back to re-measure because you didn't write it down the first time is the kind of friction that compounds badly on a tight bid schedule.
Flag existing conditions that complicate the scope. Soft spots, irrigation lines, significant tree roots: none of these get priced right now, but they get noted right now. They become contingency line items. A site plan without a field walk is a map without a territory — it tells you where things should be, not where they are.
Calculating the base system: gravel, sand, and bedding quantities layer by layer
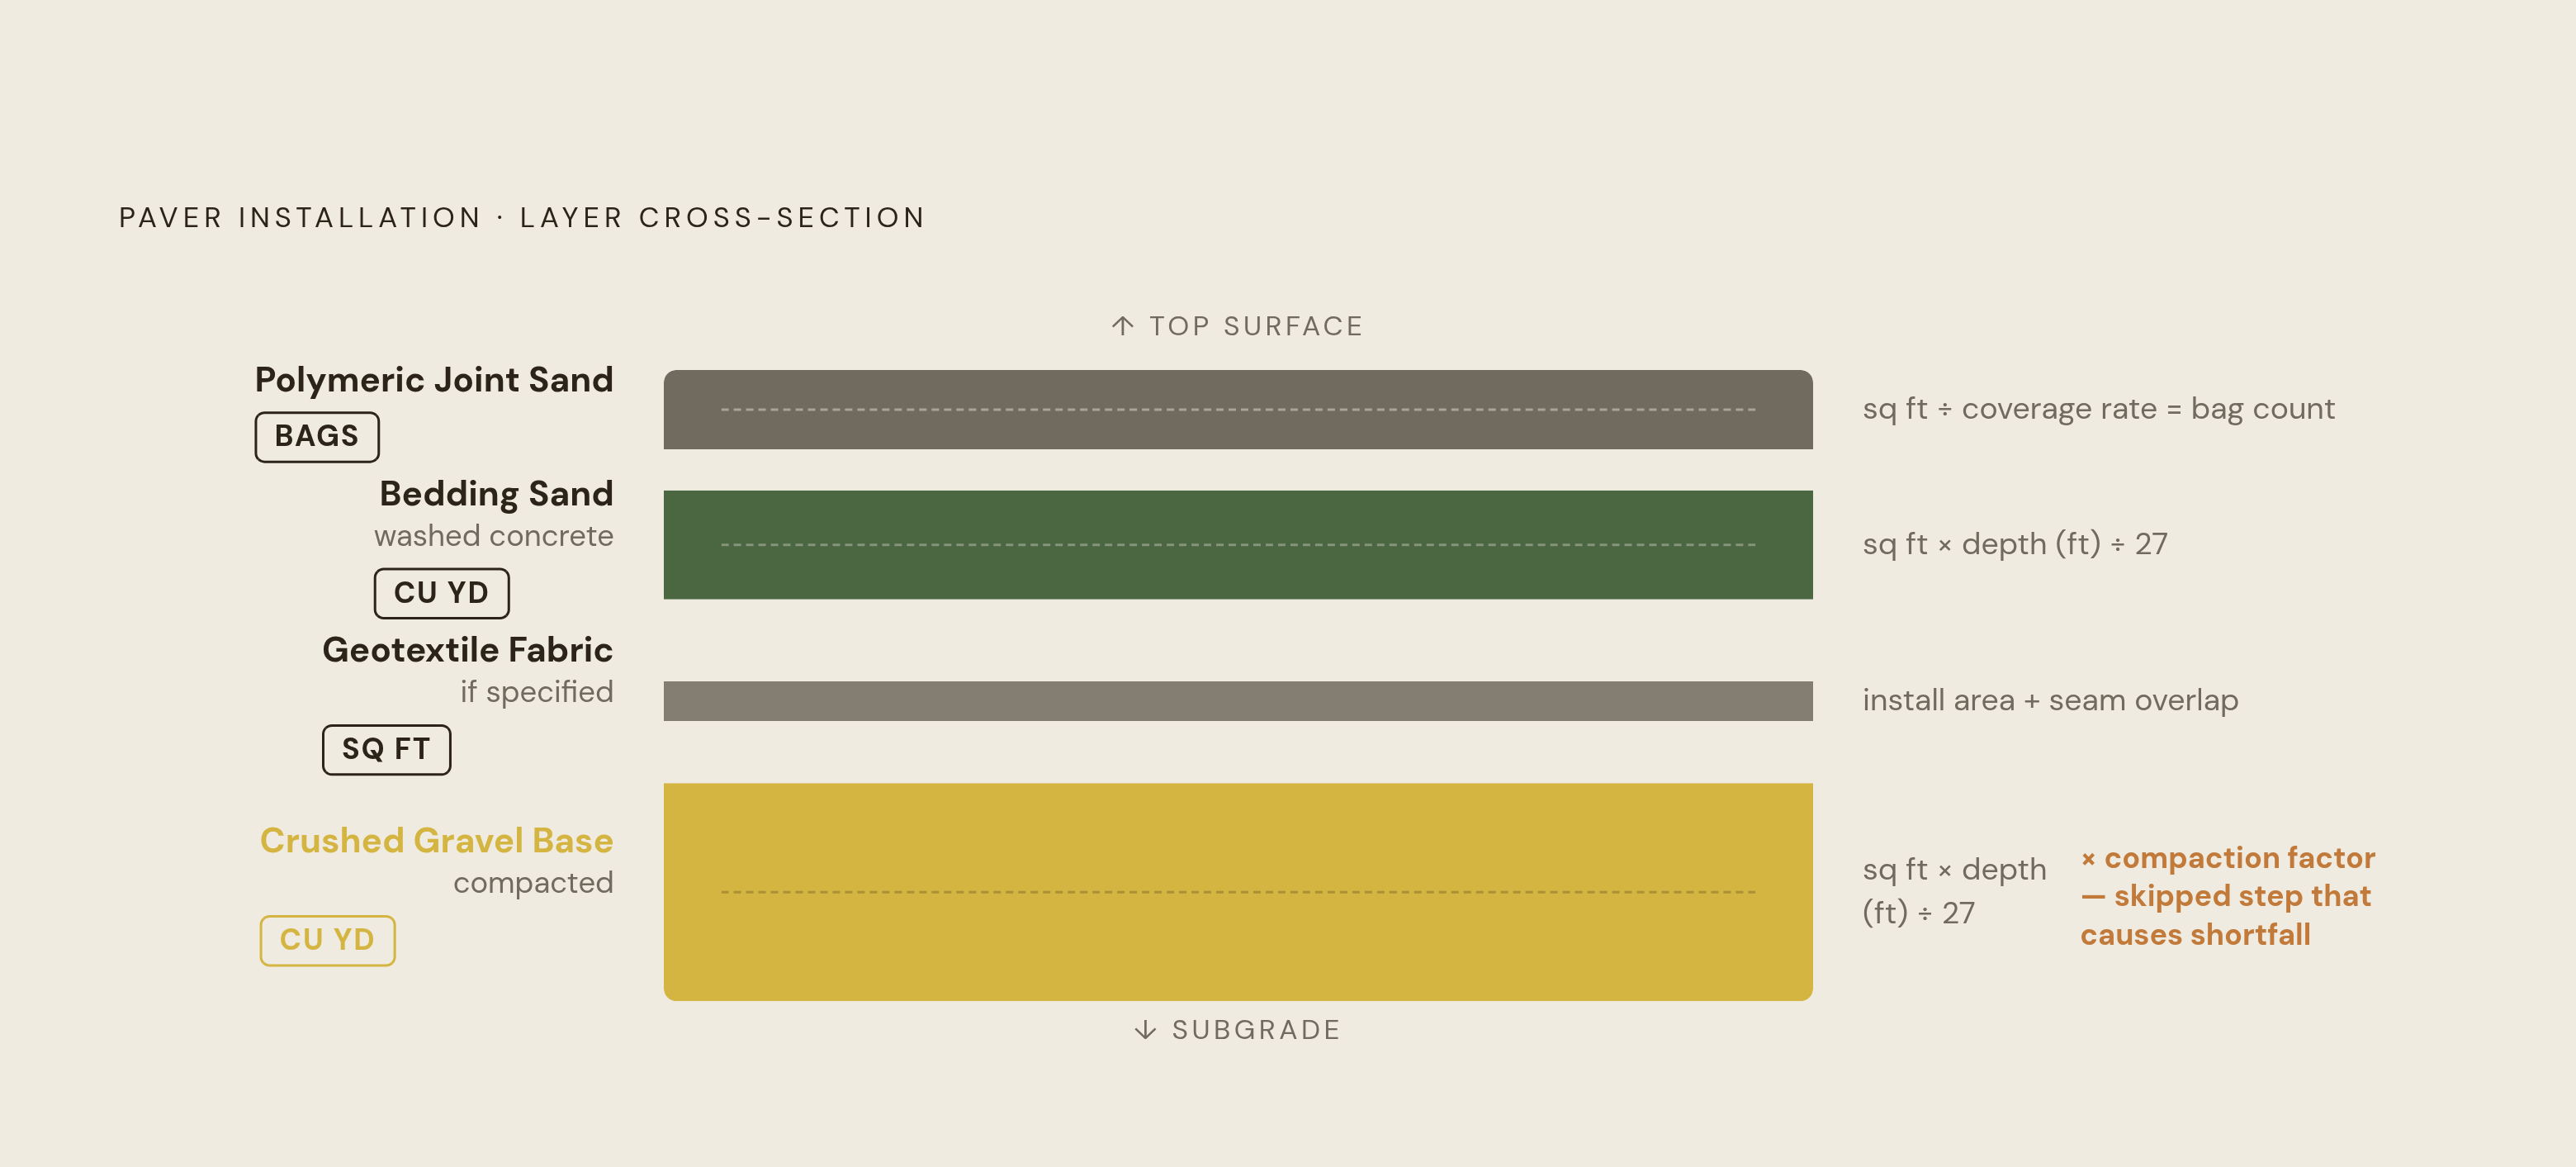
A paver installation is a layered system, and every layer is calculated independently. Each layer has a separate calculation, often a separate supplier, and typically a separate delivery window.
Layer one is the compacted crushed gravel base. Take the square footage of the zone, multiply by base depth converted to feet, and you have cubic feet. Divide by 27 to get cubic yards, which is how you'll actually order the material. Then apply a compaction factor. Volume decreases meaningfully under a plate compactor, and if you don't account for that, you will be short. The percentage varies by material and spec; confirm it with your supplier and installation guidelines rather than assuming.
Layer two is the washed concrete bedding sand. Same cubic yard conversion applies, typically at a shallower, consistent depth across residential paver applications. This is not polymeric joint sand. They are different products, ordered from different suppliers, and they belong on separate line items. I've seen contractors conflate them on a quote and spend a Friday afternoon scrambling for an emergency bedding sand delivery two-thirds through a job.
Layer three is the polymeric joint sand, and this one is calculated differently. Coverage per bag is listed on the product specification sheet, so you divide total square footage by that coverage rate to get your bag count. Paver thickness and joint width both affect consumption in ways that matter at scale. Read the spec sheet for the specific product on your current job, not last job's product.
If geotextile fabric is specified, calculate the square footage of the install area plus an overlap allowance at seams. That becomes its own line item.
Counting pavers: pattern selection, unit quantities, and the waste factor calculation
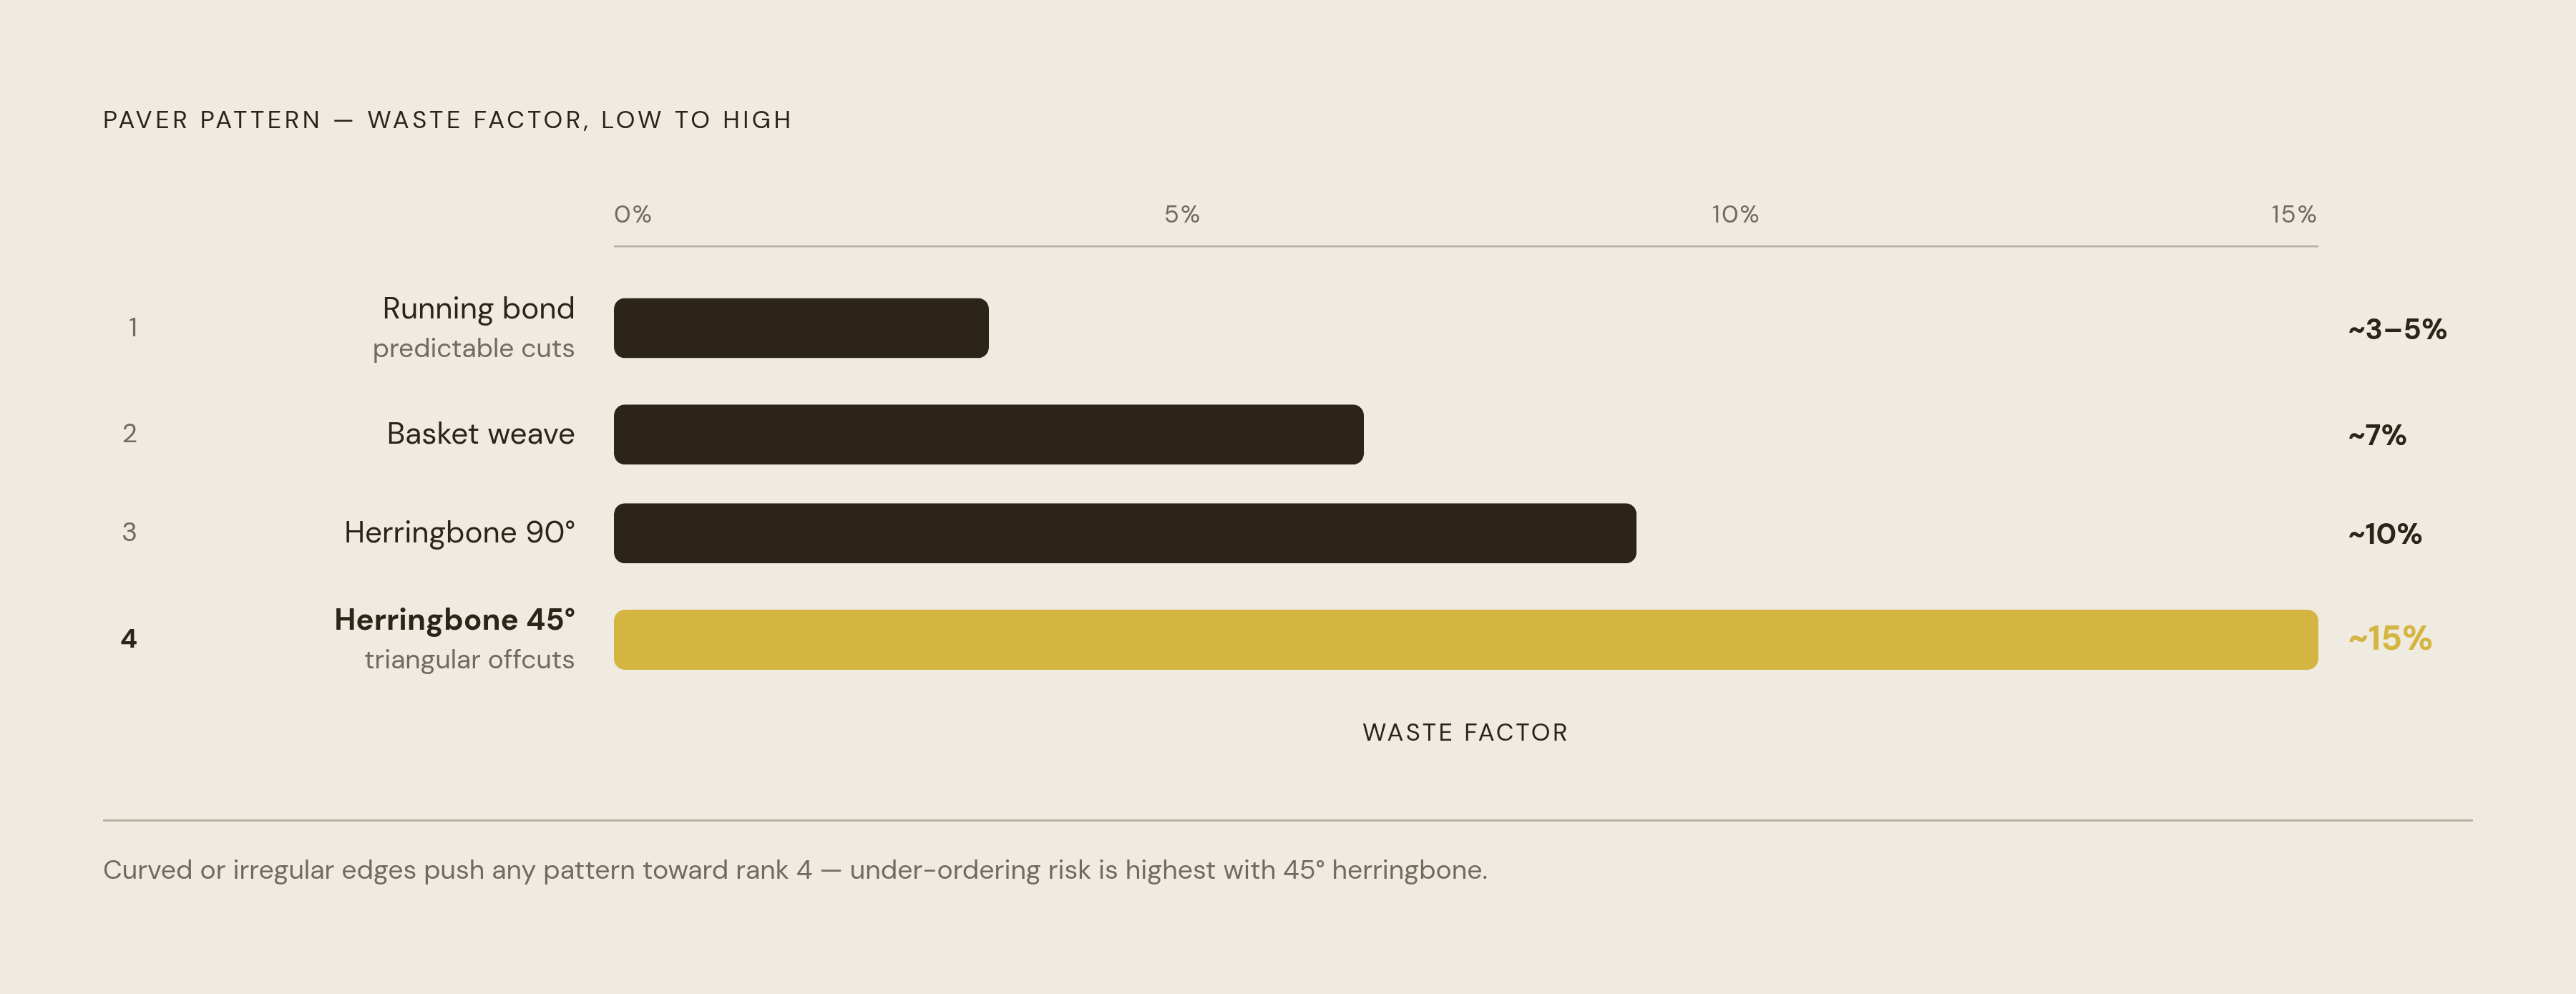
Base quantity is arithmetic: total square footage divided by the manufacturer-specified coverage per unit gives you the minimum number of pavers required. Everything added above that minimum is driven by pattern selection, which is the single largest variable in paver waste.
A running bond oriented with the long dimension parallel to the longest edge of the space produces the least waste. The cuts are predictable and the offcuts are often reusable elsewhere on the same job. A 45-degree herringbone produces the most waste of any standard pattern; the angled cuts at every border generate triangular pieces too small to salvage. The 90-degree herringbone wastes less than its 45-degree counterpart but more than running bond. Basket weave falls somewhere in the middle. Curved edges, diagonal layouts, and irregular plan geometries push waste toward the high end regardless of pattern, because the geometry creates conditions where offcuts simply cannot be reused.
The waste factor formula is direct: total units to order equals base quantity multiplied by one plus the waste percentage expressed as a decimal. On a high-waste pattern job, the gap between your base quantity and your actual order can be substantial. This is precisely where under-ordering happens, and it surfaces mid-installation when you're short and the supplier is out of your production batch.
Order everything from the same batch. Color variation between production batches is real, visible from twenty feet after installation, and not a warranty issue any supplier is obligated to resolve.
Soldier courses and border bands are calculated separately from field pavers. They often use a different unit orientation or a different paver entirely, and their quantities come from the linear perimeter measurements already documented during site reading.
Edging and perimeter materials: the line items that close the system
Edging is a linear calculation, not an area calculation. The footage comes from the perimeter documented during site reading. Before calculating material, subtract any sections where a wall, curb, or existing structure acts as a natural restraint. Only exposed perimeter requires edging.
Edging type determines installation hardware. Plastic flexible edging is secured with spikes driven into the compacted base; aluminum edging is stiffer, more commonly specified on commercial work, and priced per linear foot at a meaningfully different rate. Both require spikes or fasteners as a separate line item. Divide linear footage by spike spacing to get your count, then add overage for corners and curves, because those areas require tighter spacing and the math on a straight run will underestimate the total.
Steps and retaining walls introduce their own perimeter quantities. Cap material is calculated by linear footage of the exposed face. Retaining wall block is calculated by face square footage, height multiplied by linear run, then converted to unit count using the manufacturer's block dimensions and coverage specifications.
When edging and perimeter materials are fully accounted for, every layer from subgrade to surface edge has a quantity. The takeoff is materially closed at that point.
Organizing the takeoff into two parallel outputs: material orders and phase-based labor scheduling
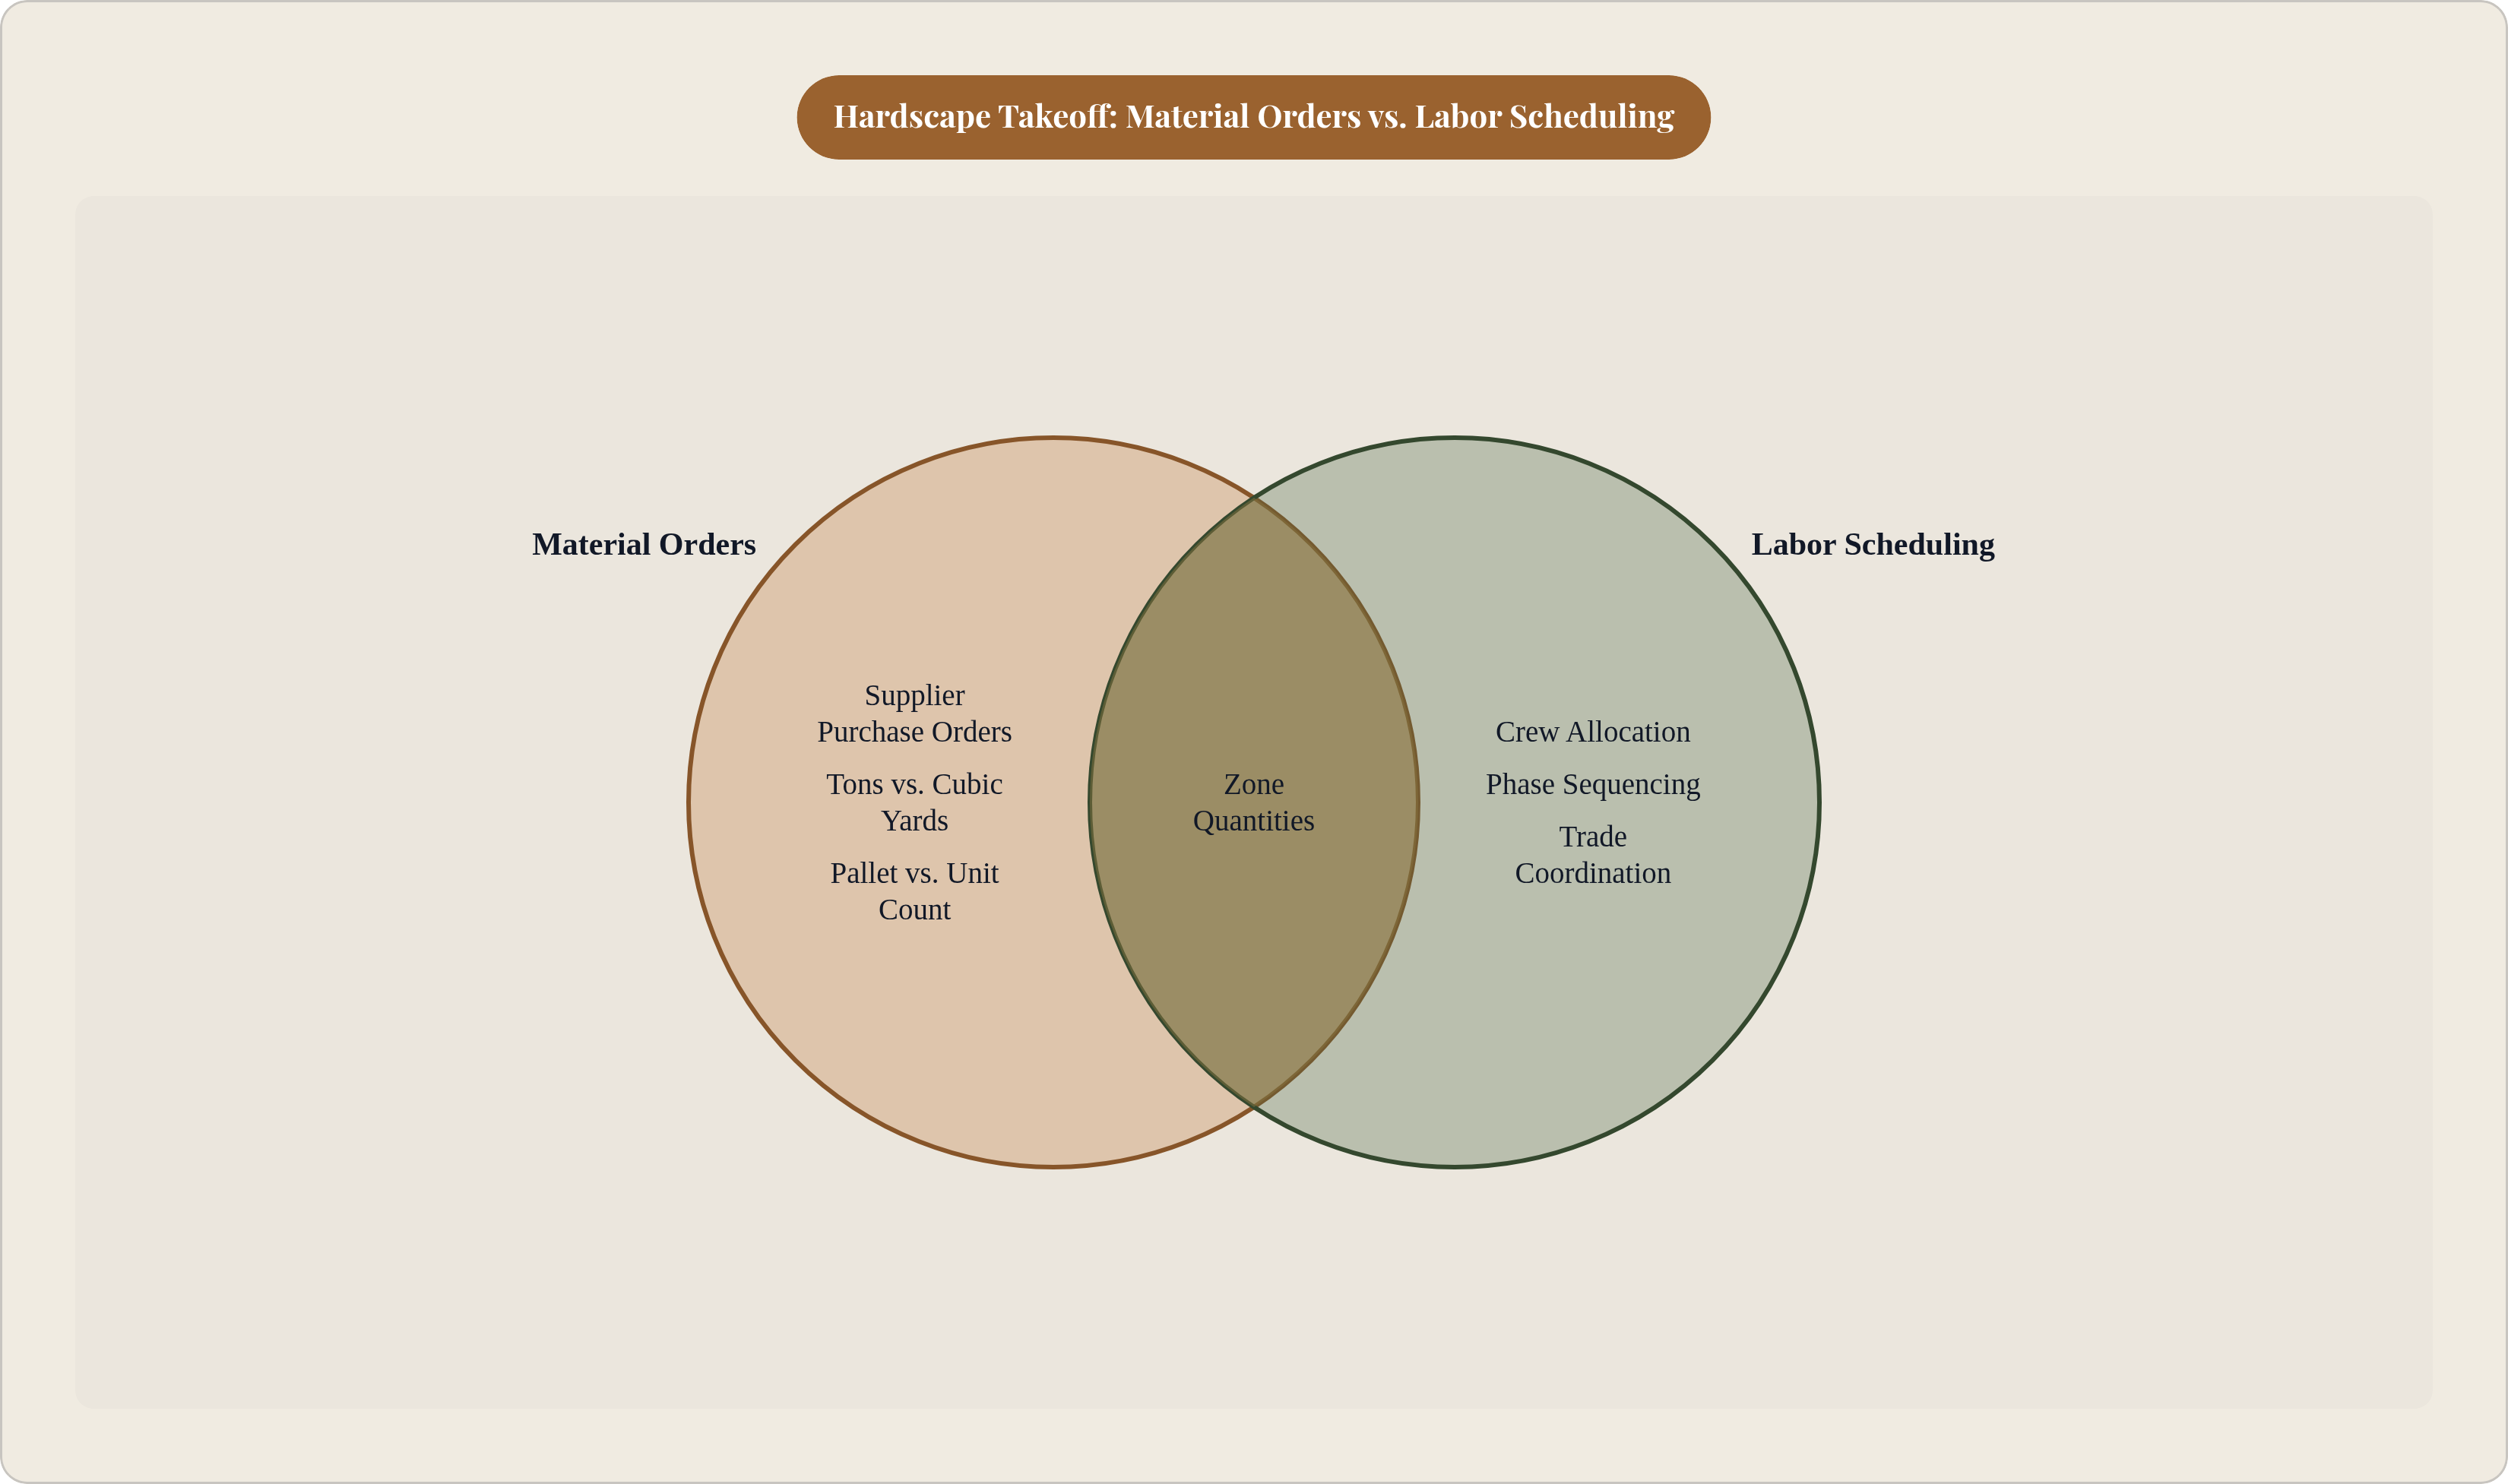
The same set of measurements needs to be organized two different ways, for two different audiences. Conflating those audiences produces documents that serve neither well.
The first output groups quantities by material type: gravel by cubic yard, bedding sand by cubic yard, polymeric sand by bag count, pavers by unit or pallet, edging by linear foot, wall block by unit. These totals feed directly into supplier purchase orders, and the quantities need to match the supplier's ordering unit exactly. Tons versus cubic yards, pallets versus individual units: confirm which unit your supplier quotes in before building the order. The conversion error is easy to make and expensive to correct after delivery.
The second output groups quantities by installation phase. Excavation and grading, base installation, bedding sand, paver setting, edging and restraints, joint sand and compaction, cleanup: this sequence answers how much work exists in each phase, which is what actually drives crew allocation and scheduling. A contractor who knows that base installation on a particular job represents two full crew-days can plan accordingly.
Both outputs come from the same underlying measurements. The only difference is how the data is sorted. On larger jobs with multiple zones, phase groupings also help coordinate sequencing with other trades working the same site.
Building the contingency line into the takeoff before pricing begins
Contingency belongs inside the takeoff document, not loosely appended to a final price after the fact.
The most common surprises on hardscape jobs are predictable in category if not in degree: soft spots in the subgrade requiring additional base depth, irrigation lines that need rerouting, tree roots encountered during excavation. All three add material and labor that no plan document could have captured. The site reading should have flagged the potential for these issues; the contingency line is the financial acknowledgment that flagged potential carries real cost implications when it materializes.
A named contingency percentage applied to the relevant portion of the takeoff creates a transparent reserve, a discrete line item that can be explained to a client if the question arises, rather than something buried in markup and difficult to defend. For projects with genuinely uncertain subgrade conditions, that percentage should be larger, and the takeoff document should say so explicitly rather than defaulting to best-case assumptions throughout.
Contingency is not profit margin. When the unexpected happens, conflating the two means spending your margin on surprises rather than earning it for work you planned and priced correctly.
What takeoffs cost to produce and where the time goes
A manual takeoff on a complex hardscape job, PDFs on one screen and a spreadsheet on the other, measurements traced by hand, can consume several hours per bid. That time carries a real cost whether it's paid to an in-house estimator or spent by the contractor personally.
For contractors doing their own takeoffs, the math gets personal quickly. Every hour in the spreadsheet is an hour not spent selling, supervising, or managing field operations. Bid volume is directly constrained by takeoff capacity. A contractor who can realistically complete only a handful of detailed takeoffs per week before deadlines force a decision will inevitably pass on jobs or rush the calculations. The cost of the rushed calculation tends to arrive after the contract is signed, which is exactly when you have the least leverage to address it.
The failure modes of a rushed takeoff are consistent and recognizable: material quantities lighter than needed, labor productivity overestimated, scope items dropped entirely. I've watched contractors build decent reputations over several seasons and then quietly bleed margin job after job because their takeoffs were consistently optimistic in the same two or three places. A rushed takeoff is like a leaky bucket — you keep filling it and wonder why you're always running dry.
How digital takeoff tools and AI-assisted software change the calculation
Standalone digital takeoff tools like PlanSwift, STACK, and Easy Takeoffs accelerate the manual process in ways that are genuinely useful without fundamentally changing who does the thinking. The estimator still performs the measurements, but on a calibrated digital plan rather than a printed sheet, which eliminates scale-reading errors and reduces the mechanical friction of tracing. These platforms sit at different price points and support different collaboration models; which one fits depends on whether bids are produced by a single estimator or a team working across multiple projects simultaneously.
AI-assisted takeoff tools go further. Beam AI, for instance, reads drawings and extracts material quantities automatically, without manual tracing. For maintenance and repeat-property work, tools in this category can measure lawns, planting beds, trees, and hardscapes from aerial imagery using an address input rather than a site plan. Whether that workflow holds up across job types and plan formats is something individual contractors will need to evaluate against their own bid mix.
What software does not replace is judgment. Subgrade assessment, pattern selection, contingency sizing, batch ordering decisions: these still require someone who understands the physical job and has made enough mistakes to recognize where the actual risk lives. The tools handle the arithmetic. The expertise handles everything the arithmetic cannot see, which, on a complicated site, is usually the part that determines whether the job makes money.